Add CognitoSync Records
back to Part 2
Code for tutorial is at Github Gist
Now that we have our CognitoSync session token we can use this to add, modify or delete CognitoSync dataset records.
To demonstrate we are going to call addRecord to add a record. Open app.js in your editor and add a call to the addRecord in the callback of getCognitoSynToken().
function getCognitoSynToken(){
  // Other AWS SDKs will automatically use the Cognito Credentials provider
  // configured in the JavaScript SDK.
  cognitosync = new AWS.CognitoSync();
  cognitosync.listRecords({
    DatasetName: COGNITO_DATASET_NAME, // required
    IdentityId: COGNITO_IDENTITY_ID,  // required
    IdentityPoolId: COGNITO_IDENTITY_POOL_ID  // required
  }, function(err, data) {
    if (err){
      errorMessage += "listRecords: " + err, err.stack + "_____";
      $('#errorConsole').text(errorMessage); // an error occurred
    }
    else {
      COGNITO_SYNC_TOKEN = data.SyncSessionToken;
      COGNITO_SYNC_COUNT = data.DatasetSyncCount;
      message += "listRecords: " + JSON.stringify(data) + "_____";
      message += "DatasetSyncCount: " + COGNITO_SYNC_COUNT + "_____";
      $('#appConsole').text(message);       // successful response
      addRecord();
    }
  });
}
Now lets add a record user_id that stores the users facebook id. We need to not only pass the CognitoSync session token but also the sync count that we got from the call to listRecords. There is a call to a function createS3() in the callback of addRecord() below, please comment this out for now as we will be building this later.function addRecord(){
var params = {
DatasetName: COGNITO_DATASET_NAME, // required
IdentityId: COGNITO_IDENTITY_ID, // required
IdentityPoolId: COGNITO_IDENTITY_POOL_ID, // required
SyncSessionToken: COGNITO_SYNC_TOKEN, // required
RecordPatches: [
{
Key: 'USER_ID', // required
Op: 'replace', // required
SyncCount: COGNITO_SYNC_COUNT, // required
Value: FACEBOOK_USER.id
}
]
};
console.log("UserID: ".cyan + FACEBOOK_USER.id);
cognitosync.updateRecords(params, function(err, data) {
if (err){
errorMessage += "updateRecords: " + err, err.stack + "_____";
$('#errorConsole').text(errorMessage); // an error occurred
}
else{
message += "Value: " + JSON.stringify(data) + "_____";
$('#appConsole').text(message); // successful response
createS3();
}
});
}
Now you can build and run your app. You should be able to login to Facebook and add a user record to the dataset.We can also use our CognitoID credentials to access other AWS resources. Next we will access an S3 bucket and add a folder and file to it.
Access an AWS S3 Bucket
Not only can we use our CognitoID temporary credentials do access CongitoSync, we can use it access many other AWS resources.First we need to modify our apps IAM role to allow access to S3. It is extremely important when doing this to ensure that the user only has access to a folder with their CognitoID. Otherwise someone can maliciously dump a few terabytes into your S3 bucket or even worse start deleting objects.
Go into the AWS IAM Console.
Click on roles and select the IAM role you created.
Click on Manage Policy

Now change the policy to allow access to a folder in the user's CognitoID. It is very important to ensure that the "Version": "2012-10-17" statement is included otherwise the policy variables will not be recognised. Then click on Apply Policy.
{
"Version": "2012-10-17",
    "Statement":
    [
     {
         "Action": [
             "mobileanalytics:PutEvents",
             "cognito-sync:*"
         ],
         "Effect": "Allow",
         "Resource": [
             "*"
         ]
     },
    {
      "Effect": "Allow",
      "Action": [
        "s3:GetObject",
        "s3:PutObject",
        "s3:PutObjectAcl",
        "s3:DeleteObject"
      ],
      "Resource": [
        "arn:aws:s3:::backspace-cognito-test/${cognito-identity.amazonaws.com:sub}/*",
        "arn:aws:s3:::backspace-cognito-test/${cognito-identity.amazonaws.com:sub}"
      ]
    }
  ]
}
To demonstrate we are going to call createS3 to create a folder in the user's name and add an object to it. Open app.js in your editor and add a call to the createS3 in the callback of addRecord().function addRecord(){
var params = {
DatasetName: COGNITO_DATASET_NAME, // required
IdentityId: COGNITO_IDENTITY_ID, // required
IdentityPoolId: COGNITO_IDENTITY_POOL_ID, // required
SyncSessionToken: COGNITO_SYNC_TOKEN, // required
RecordPatches: [
{
Key: 'USER_ID', // required
Op: 'replace', // required
SyncCount: COGNITO_SYNC_COUNT, // required
Value: FACEBOOK_USER.id
}
]
};
console.log("UserID: ".cyan + FACEBOOK_USER.id);
cognitosync.updateRecords(params, function(err, data) {
if (err){
errorMessage += "updateRecords: " + err, err.stack + "_____";
$('#errorConsole').text(errorMessage); // an error occurred
}
else{
message += "Value: " + JSON.stringify(data) + "_____";
$('#appConsole').text(message); // successful response
createS3();
}
});
}
Next you need to go into the AWS S3 Console and create a bucket.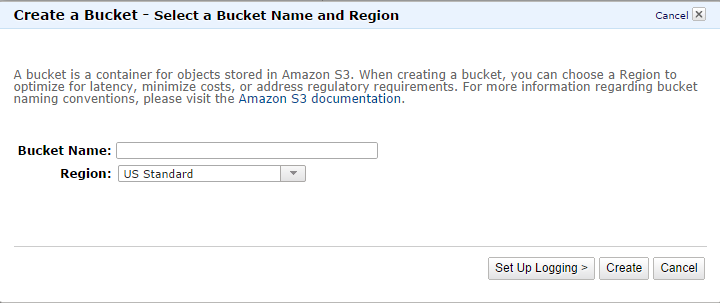
Now lets add a folder to the bucket in the name of the user's CognitoID. Then we will add a text file to it with the contents "Hello". You need to change the bucket name to the name of your bucket.
function createS3(){
  var bucket = new AWS.S3({
    params: {
      Bucket: 'backspace-cognito-test'
    }
  });
  //Object key will be facebook-USERID#/FILE_NAME
  var objKey = COGNITO_IDENTITY_ID+'/test.txt';
  var params = {
      Key: objKey,
      ContentType: 'text/plain',
      Body: "Hello!",
      ACL: 'public-read'
  };
  bucket.putObject(params, function (err, data) {
    if (err) {
      errorMessage += 'COGNITO_IDENTITY_ID: ' + COGNITO_IDENTITY_ID + "_____";
      $('#errorConsole').text(errorMessage); // an error occurred
      errorMessage += 'putObject: ' + err + "_____";
      $('#errorConsole').text(errorMessage); // an error occurred
    } else {
      message += "Successfully uploaded data to your S3 bucket" + "_____";
      $('#appConsole').text(message);       // successful response
    }
  });
}
Now you can build and run your app. You should be able to login to Facebook and access S3.Its all up to you now to identify how you are going to use this power! Maybe some big data crunching with Elastic Map Reduce, backup to Glacier or some heavy scientific processing with EC2.
Like coding? AWS Certified Developers are in HOT demand! Check out BackSpace Academy for more details.
No comments:
Post a Comment